|
Interpreting & Using Histograms Text & Images © 2007 - 2012 Ron Day Of the many tools available to the digital photographer, the histogram is the most powerful. It allows the photographer to analyze the exposure of an image on the camera's LCD screen, and to make on-the-spot adjustments necessary to achieve correct exposure. This was not possible in the days of film.
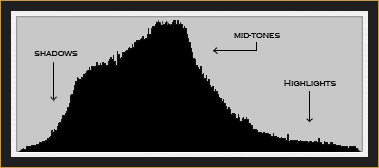
A histogram is a graph mapping out the tones, or levels of brightness, of the pixels in an image. At the ends of the horizontal axis, pure black is represented on the left, and pure white is on the right. Within the graph, shadow pixels are on the left, highlight pixels are on the right, and mid-tones are in between. The vertical axis of the histogram shows the number of pixels which comprise each specific tone, or level of brightness, lying between pure black and pure white. The histogram in Figure 1, shows that the majority of the pixels in the image are mid-tones, and that fewer pixels makeup the shadows and highlights. Figure 1 is the histogram of the Red Fox photograph, in Figure 2, below. It reveals correct exposure for this photograph.
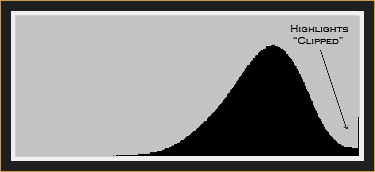
There is no magic shape or form to strive for in a histogram. The bell shaped curve in Figure 1 is appropriate for the Red Fox photograph, but it's not necessarily correct for all images. No two photographs are identical, and no two histograms are equal in form. In fact, in low contrast or overcast conditions the vast majority of the pixels mapped on the histogram may be mid-tones, and the few shadow and highlight pixels present may not extend to the respective ends of the graph. There are, however, certain characteristics to watch for and avoid. When a photograph is overexposed, for example, the tones of the pixels are often biased to the right side of the histogram, as in Figure 3. Notice the spike at the level of pure white on the right margin. This means that some of the highlights in the image have been blown, or "clipped", and lost. The result is a photograph with detail missing in the highlights -- a circumstance to avoid.
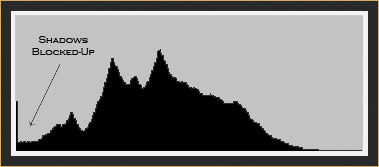
In the field, activate the camera's "flashing highlights" to warn of overexposure when viewing images on the LCD screen. Whenever "flashing highlights" or the histogram show overexposure, then depending on the shooting conditions either stop-down the aperture, increase the shutter speed, decrease the ISO, or decrease exposure compensation to move the graph toward the left. Recheck the histogram, and make additional adjustments until the histogram shows that the highlights are no longer "clipped" on the right margin. Conversely, when a photograph is underexposed, the histogram often reveals the tones of the pixels are biased to the left, as in Figure 4. The spike at the point of pure black on the left margin means that some of the shadows in the image are "blocked-up", and lost. The result is a photograph missing some of the detail in the shadows -- another scenario to avoid.
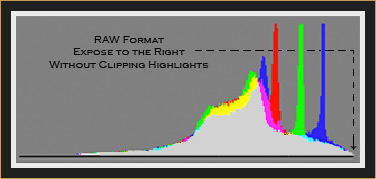
When the histogram shows underexposure, then as shooting conditions allow either open-up the aperture, decrease the shutter speed, increase the ISO, or increase exposure compensation to move the graph toward the right. Recheck the histogram, and make additional adjustments until the histogram confirms that the shadows are no longer "blocked-up" on the left margin. If the levels of light in a scene exceed the dynamic range of the camera's sensor, what is the best approach? Most photographers agree that it's better to preserve detail in the highlights, and to sacrifice some detail in the shadows. However, do not underexpose more than is needed to preserve the highlights, or noise will be injected unnecessarily into the image. An often-used technique for obtaining reliable exposure with RAW files (not JPEGs), is to place the right side of the data reflected in your camera's histogram as close as possible to the right margin, without "clipping" or blowing the highlights. See, Figure 5. This purportedly maximizes the signal-to-noise ratio in the image, thus providing better image quality, smoother tonal transitions, and less noise.
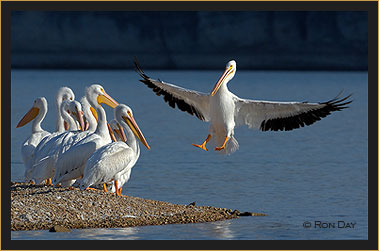
As a practical matter while in the field, first set the camera to an exposure believed to be correct for the subject matter. Next, make a test exposure to double-check the accuracy of the exposure settings. If necessary, adjust the exposure until the histogram reveals proper exposure has been achieved. So, tailor the exposure to the circumstances, and use the histogram to confirm that the exposure is correct. To photograph a pelican in flight over the water, similar to the one in Figure 6 for example, first set the exposure and try photographing a pelican at the water's edge. Check that histogram, make any necessary adjustments to exposure, and then photograph the next incoming pelican in flight. If the flight histogram shows more adjustment is required, continue to fine tune the exposure. Once the flight histogram confirms the exposure is correct, continue flight shooting at that exposure, rechecking the histogram about every ten frames or so, or whenever there is a noticeable change in the light.
In the days of shooting film, if there were a way to guarantee accurate exposure, photographers would have paid a modest ransom for it. Today, all one needs to do is shoot digital. Now, a savvy photographer can interpret the histogram, make on-the-spot adjustments, and be guaranteed of a correct exposure. Indeed, several professional digital SLR cameras today can display separate histograms for all three color channels, allowing even finer precision. Master the histogram, and you can master digital photography. Text & Images © 2007 - 2012 Ron Day
|
|||||||||||||||||||